In case you are not sure if the equipment you are currently using for your monitoring and measuring activities is the most adequate equipment or if you are wondering why such as expensive tool is used to inspect a certain part, then it may be worth for you to understand tolerances, accuracy and what the impact of the equipment on meeting your specification requirements.
Understanding the basics
Basically before you select the equipment or tools necessary to inspect or measure your product or parts, you need determine the tolerance of the measurements or inspection to be done. Let’s take 2 examples:
- Outside diameter of steel tubes before cutting
- Weight of boxes containing product after packaging
Suppose you are trying to measure outside diameter of steel tubes before you cut them to a certain length. Basically, if you select calipers to determine the diameter then most likely you will be able to measure with a 1-, 2-, 3 or more digit accuracy or precision. If you decide to measure using a ruler, then I would have to think that your accuracy is not entirely important because you will only be able to measure in whole inches or sixteenths of an inch. The required tolerance will determine the accuracy of the equipment needed.
Let’s look at each example one by one to understand how we arrive to the accuracy needed.
Outside diameter
If you have a drawing of the tube with the outside diameter dimensions, then you will be able to see how those dimensions are shown. You may see the dimension in several forms, for example:
- 5 ± 0.005
- 5 β plus note on the drawing footnotes that β = ± 0.005 digits.
- 4.995 to 5.005
In these 3 examples, the dimensions carry 3 digits and therefore you need instruments that can read with 3-digit accuracy.
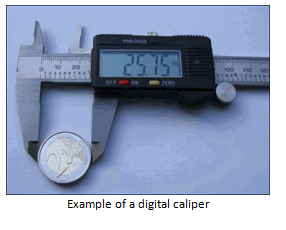
 Let’s suppose you decide to use a digital caliper. You set the caliper to read inches and then you proceed to measure. The caliper will immediately read the dimension to several digits of accuracy. For example you may get: 5.004 inches. In this case it will be easy to conclude that the part meets specs.
Now let’s pretend you decide to use a ruler. By using a ruler you may find out that the inside diameter is somewhere between 5 inches and 5 1/16 inches.
Now you have to convert 1/16 to decimals which returns 0.063. Therefore you overall dimension is now anywhere from 5 to 5.063 inches. You should conclude after making all these calculations that the ruler is not practical because you cannot make a definite decision as to whether the part meets specs or not.
With this simple example it is easy to demonstrate that a ruler is not capable to meet the accuracy required to inspect the part. Digital calipers however are capable of meeting the required accuracy and are adequate instruments for inspecting the outside diameter of steel tubes.
Weight of boxes containing product after packaging
Depending on what the product is, weight typically does not require a great deal of accuracy, perhaps 1 or 2 digits. However let’s look at the example of putting bottles of pills in a box, where each box contains 20 bottles and each bottle contains 50 pills; and where each pill weighs 1 ± 0.05 grams or basically between 0.95 to 1.05 grams. And let’s assume that the bottle filling is an automated process. The concern in this example is to make sure that each bottle in the box contains exactly 50 pills.
With minor calculation, we determine that each box should weigh 1000 grams. It is also easy to know that if a bottle is missing, then we would be missing 50 grams from the overall weigh. However how do we determine if 1 pill is missing out of one of the bottles? Well, based on the pill’s lower weight range, we determine that we would have to be missing 0.95 grams to detect if 1 full pill is missing from one of the bottles in the box. Missing half a pill would be 0.475 grams and so forth.
Now let’s assume you buy a scale that can weigh grams as a whole without decimals. So if you weigh one box of bottle pills where one of the pills weighs only 0.45 grams, then theoretically you should get a reading of 999.55 grams however since the scale you are using shows whole numbers only, you will get a reading 1000 grams.
Now let’s look at the same case scenario using a scale that shows up to 2 decimals. Using the same example above, you can weigh the box with the pill which weighs 0.45 grams and you will clearly see a reading on the scale of 999.55 grams.
Your conclusion should be that a scale capable of weighing grams and at least 2 decimals is necessary in order to get an accurate weight count. Such a scale may be more costly, but without it, you will not be capable of monitor and/or measure your product accurately.
Final considerations
Of course you have to assess what the impact of not having a full pill may be in your business. A pill in the example above could represent a micro chip, a screw or another important or less important part in your world. In essence, if you are unsure about the equipment used in your measuring and monitoring activities, determine what your tolerances are, and then make an informed decision on the quality of the equipment needed to accurately achieve the required specifications.
Advance Your Knowledge with API and ISO Training from Mireaux University
Whether you’re preparing for certification or ready to take your team’s expertise to the next level, Mireaux training gives you the tools to succeed. Through Mireaux University (Mireaux-U) — our dynamic online learning platform — you can access course materials anytime, watch exclusive bonus videos, take your online exam, and download your certificate instantly. Experience expert-led training and real-world insights designed to empower your success. And link Mireaux University to this page:
ISO Training API Training


